Use this process to generate and email or print Statements for multiple members by account types.
Quick Guide
- Navigate to Financials and select Statements
- Click + Statements button
- Set the Generate Statements fields then click +Create button
- The Statement generation progress task bar will show top of screen. When the progress reaches 100% click the magnifying glass icon to redirect to the Statements batch
- In Statements : Batch screen select some, or all, Statements to apply an action
- Click the Bulk Action button and select required action from drop down menu. Options include Export Statements, Send Message, Email Account Statements, Print Statements, Change Date, Delete Statements, View Selected Statements or View Associated Members
Step by Step Guide
Step 1 - Navigate to the create statements generation tool
- From the main menu select Financials and then Statements
- Click +Statements button

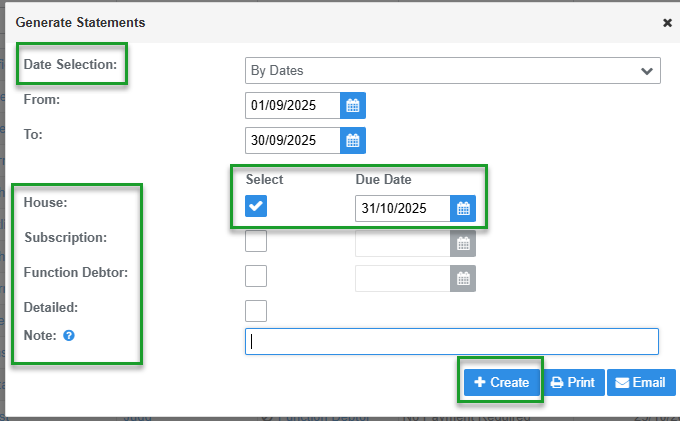
Step 2 - Set the fields in the Generate Statements tool and create statements
- Select Date Selection from the member options: By Month or By Dates
- If the By Dates option is selected enter the To and From dates for the statement start and end period
- The By Month statements can't be created until the 1st day of the following month i.e. January statements can't be created until 1 February
- Select the Account. Only the transactions made in the Month or within the By Dates for the selected account will appear on the statement
- Enter a Due Date. Only required if the transactions on the statement are payable by a specific date (generally not required for membership subscription or other general invoices because they have their own due date) - refer to important notes below for House or Charge to Accounts
- (Optional) select Detailed if you require a list of all transactions made within the selected period to appear on the statement
- (Optional) add a Note to the statements. Visible to member
- Click the +Create button
Important Notes:
- House or Charge To Accounts: If the Account Type settings include a due date i.e. number of days after statement is created and grace (default) period for payment, the due date will fill automatically and cannot be changed.
- If the statement remains unpaid after the due and default dates have passed the member's membership statuses will change to Inactive and Unfinancial
Step 3 - Review and email or print statements
- The Statement Generation progress task bar will show top of screen. When the progress reaches 100% complete click the Magnifying Glass icon to redirect to the Statements batch
- In Statements : Batch screen Select some, or all, Statements to apply an action
- Click the Bulk Action button and select required action from drop down menu. Options include Export Statements, Send Message, Email Account Statements, Print Statements, Change Date, Delete Statements, View Selected Statements or View Associated Members


Was this article helpful?
That’s Great!
Thank you for your feedback
Sorry! We couldn't be helpful
Thank you for your feedback
Feedback sent
We appreciate your effort and will try to fix the article